Soil constraints are a range of limiting factors present in the soil environment that can adversely impact plant growth, agricultural productivity, and ecosystem health.
These constraints could be physical, chemical, and biological factors that collectively affect soil structure, nutrient availability, water retention, and overall soil fertility.
Soil constraints have an annual yield penalty costing billions in lost income. In wheat alone, soil acidity is estimated to cost A$400 million each year (Orton et al. 2018). Efforts into ameliorating soil constraints has had considerable focus over the last fifteen or so years, but there is still much to learn.
Understanding and managing soil constraints are vital for sustainable land use and effective crop management, as they directly influence the success of agricultural operations. land restoration projects, and environmental conservation efforts.
By identifying and addressing these constraints, farmers, land managers, and researchers can optimise soil conditions and promote healthy plant growth, leading to improved productivity, and resilience in various landscapes.
Let’s look at some of the key soil constraint factors that can limit soil functionality, their impact, and potential mitigation strategies.
The first step to ameliorating soil constraints is knowing where they are.
As grid soil sampling is cost-prohibitive in Australia, but many growers and advisers use spatial data such as yield maps to divide paddocks into zones and find poorly performing areas that could be due to soil constraints. More information on how to use spatial data is in Module 7: Precision Agriculture for Soils.
After years of seeing a farm through wet and dry seasons, most growers have a very good idea of where the problem areas on their farms are. This information combined with spatial data is a good way to narrow down the search area for constraints.
The first step to ameliorating soil constraints is knowing where they are.
Tackling amelioration on variable soil types outlines one way to map constraints on the farm and choose which areas to ameliorate. The Dispersive Soil Manual outlines a process specific to dispersive soils and their associated constraints. Both methods involve using aerial maps, yield maps, soil maps etc. to find problem areas, then ground truthing with soil tests to confirm the extend and severity of constraints. This first step can be laborious but necessary to avoid wasting time and money ‘fixing’ a problem that isn’t there.
Most crops have a preferred soil pH range. Outside of this range, crop growth slows because,
In acidic soils, many key plant nutrients including nitrogen, phosphorus, sulfur, calcium, and molybdenum are less available for plant uptake.
Manganese toxicity is more common with lucerne, cabbage, cauliflower, cereals, clover, pineapple, potato, and tomato (Incitec Pivot Fertilisers, 2022). As with most trace elements, tissue tests are better to diagnose manganese toxicity than soil tests.
With lower microbial activity:
Organic matter breakdown and nutrient release (mineralisation) slows.
Legume nodulation can fail. Most rhizobia bacteria prefer a soil pH > 5.5 but the individual species may vary in their tolerance to acidity. For example, medic rhizobia (Sinorhizobium spp.) prefer a pH closer to 7 while rhizobia on lupins (Bradyrhizobium spp.) can tolerate more acidic conditions.
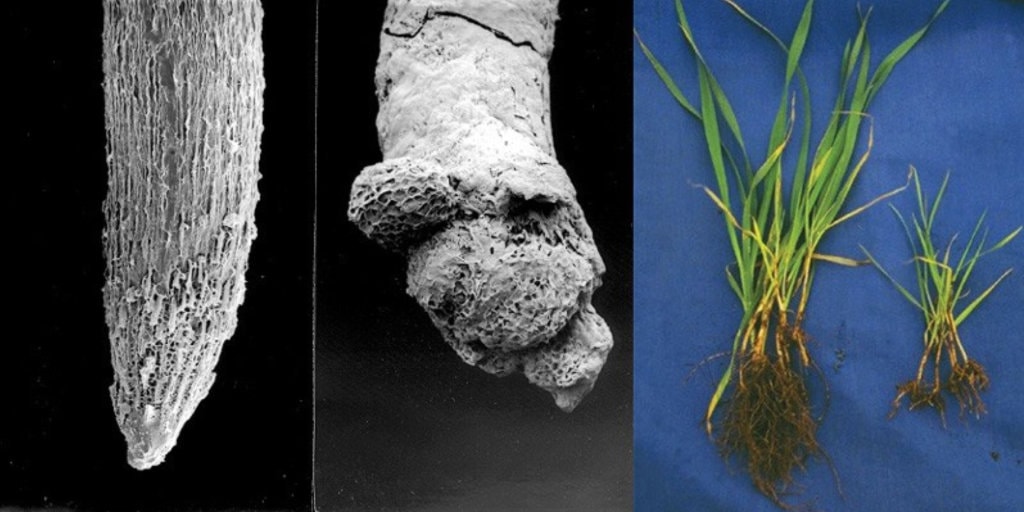
Figure 1. Damage to the root system, growth, and development of wheat (right) caused by aluminium toxicity in acidic soil, compared to the unaffected (left). (Source: OMEX Agriculture Inc. Canada.)
Measuring soil pH is the only way to diagnose acidity. This is best done with laboratory tests; however, the field kits can give a guide to soil pH and help you decide which areas need further investigation. As a minimum, test pH at 0-10cm, 10-20cm, and 20-30cm depths.
An acidic subsurface layer, for example from 2-4 cm, limits root growth in some soils. It can go undiagnosed because the 0-10 cm samples average out the soil pH. To check for subsurface acidity either break up the sample into 0-5 and 5-10cm, or if there is a soil corer, do an indicator test down the profile to help identify the acidic band.
Use crop guidelines to decide if soil pH is too low as different crops can tolerate different pH levels. Generally, a cropping soil is considered acidic if the pH is <5.5 from 0-10 cm and <5.0 below 10 cm.
Liming is the most cost-effective way to treat acidic soil. Without liming, the soil will continue to acidify, further penalising yields and costing more to fix.
Agricultural limestone, lime sand, and dolomite are common lime sources. Not all lime sources are created equal. How well a lime works depends on its particle size and neutralising value (NV). The higher the NV and smaller the particle size, the faster it works. Because lime is mined, the characteristics will vary between sources and even within pits. Comparing lime sources has more guidance.
There are multiple calculators (e.g., Southern Farming Systems Lime Assist calculator, DPIRD’s iLime) to help compare lime sources. These calculators include the costs of lime and transport, and ability to treat acidity, to help you decide on how much lime to add and which lime source is the best value.
Top-dressed lime can take 10 years or more to start treating acidity below 10cm depth. If subsoil acidity is a problem now, the lime needs to be incorporated into the acidic layer(s).
Choosing cultivars more tolerant of acidity or alkalinity help maintain productivity.
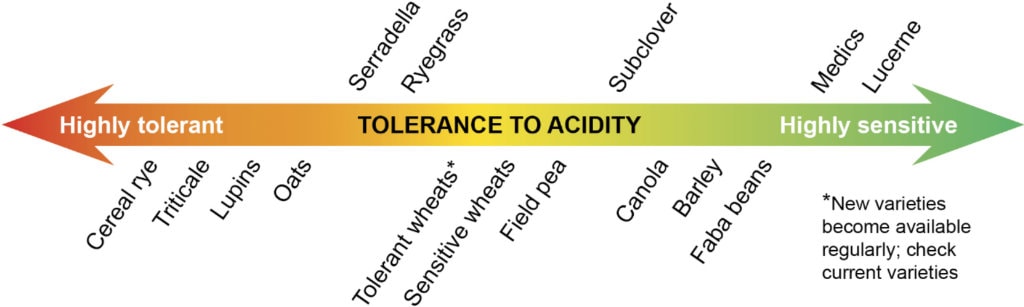
Figure 2. Relative tolerance of crops and pastures to soil acidity and aluminium toxicity. (Source: DPIRD, 2018.)
Saline soils have higher levels of salts in the soil water, making it harder for crops to extract water and nutrients. The higher the salinity the more energy plants need to take up water. If soil salinity is high enough (when the concentration in the soil is higher than inside the plant roots), water moves out of the plant roots and into the soil water, drying out the plant.
Saline soils can also cause chloride toxicity in plants. Germinating plants and seedlings are more susceptible to salinity than older plants.
There are multiple types and causes of salinity, which affect how they are managed.
Dryland salinity is the most common form of salinity in broadacre agriculture. It occurs when salts in the groundwater or already in the soil rise to the surface.
The issue is greater in clay soils more than sands, when evaporation is high (hot summers, bare soil) and when the water table is within 3m of the surface. Because clay soils have ‘tighter’ pores, they have greater capillary rise. Water and dissolved salts can move further up towards the surface than in sands with larger pores. As the water evaporates from the soil, the salts are left behind and concentrate over time, eventually becoming too toxic for crop growth. Bare areas area then prone to erosion.
Irrigating crops with salty water will cause salts to build up in the soil.
The soil along saline creeks and riverbanks tends to be saline. As it rains and the creeks swell, they can leave salts in the areas around the banks.
High gypsum, fertiliser and manure applications can temporarily inflate soil salinity. As long as high application rates do not continue regularly, these will drop back down again.
Testing the electrical conductivity (EC) of the soil is the best way to diagnose soil salinity. This is described more in . Generally, a soil with an EC reading <2dS/m is not saline.
There are some visual clues to salinity; however, these must be confirmed with soil testing.
EM38 surveys measure conductivity and can be useful to identify potential areas of salinity on the farm. Again, these need to be confirmed with lab tests to identify the extent and severity of salinity. EM38 surveys are discussed more in Module 7: Precision Agriculture for Soils
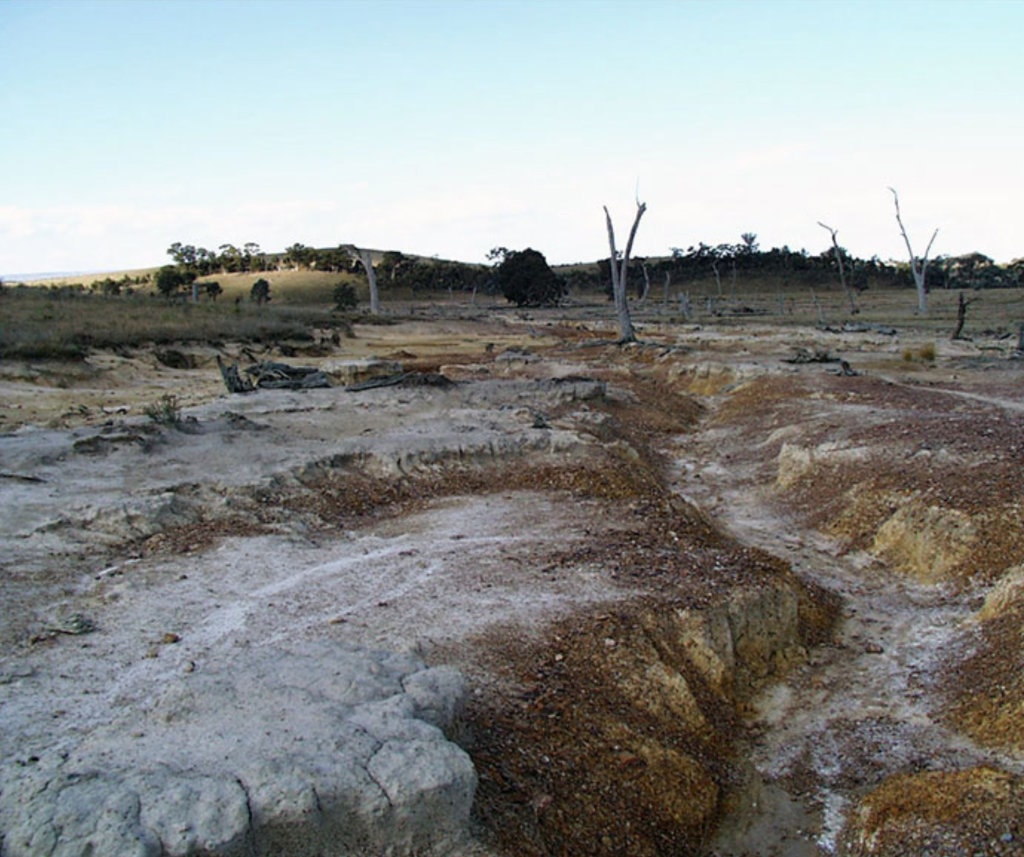
Figure 3. Salt-crusting and soil erosion due to salinity. (Source: NSW Department of Planning and Environment)
The key to managing dry saline land is to stop salty water rising to the surface. This could be done by keeping the soil covered with crops and mulches to limit evaporation.
Strategies include:
Salt-tolerant crops are one of the best management techniques for saline soils. They will limit evaporation and salt rise.
Do not let stock over graze/bare-out areas.
For small bare areas, mulch will limit evaporation from the soil. This is not economical on large scale.
While there is no fertiliser or product to fix soil salinity, fixing other soil issues such as poor drainage and maintaining balanced crop nutrition
will give crops the best chance of survival in saline soils.
If the soil is both saline and dispersive ( see dispersive soils ), gypsum can help improve soil structure and facilitate leaching.
Install contour banks or swales to manage surface water flows, and limit erosion and waterlogging.
If waterlogging is making salinity worse ( see waterlogging ), consider ways to reduce waterlogging such as surface water management, and drainage.
In irrigated crops, leaching the soil by irrigating with non-saline water can wash excess salts beneath the root zone.
Take care – if the salinity has not come from saline irrigation water, over irrigating can lead to waterlogging and exacerbate the problem.
If areas of salinity are severe enough, it might be worthwhile to remove the areas from production and revegetate the land.
Dispersive soils are sometimes called Sunday country (too wet Saturday, too hard and dry Monday). This is because when dispersive soils are wet, the aggregates collapse, and the soil becomes boggy. It then dries into a hardened, structureless mass.
Dispersive topsoils develop a crust that inhibits seedling emergence and infiltration, causing run-off and erosion. Dispersive subsoils can be too dense for crop roots to grow through, limiting access to water and nutrients, and cause waterlogging as well.
Dispersive soils often have other chemical issues including salinity, high pH (alkalinity), boron and chloride toxicity, and nitrogen losses from denitrification.
The term dispersive soil is often used interchangeably with sodic soil, but the two are not synonymous. Sodic soil has exchangeable sodium levels >6%. Although too much sodium is the common driver of dispersion, soils do not always disperse once ESP exceeds 6%. There are soils that disperse with an ESP of 4, and those with an ESP of 18 that do not disperse. This is because other soil properties, including salinity, clay content, clay mineralogy, and organic matter content affect dispersion.
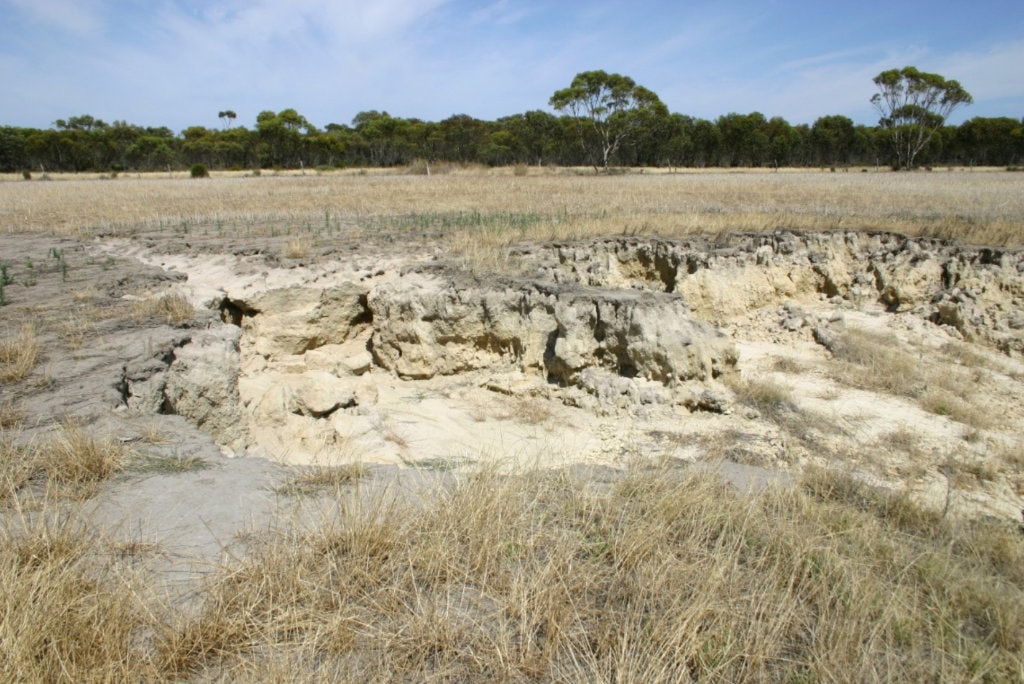
Figure 4. A dispersing sodic soil in a waterlogged landscape, causing severe land degradation. (Source: ©2008 Timothy Overheu, DPIRD)
Some common signs of dispersive soil include:
In plants:
Poor or patchy establishment
Bare areas
Shallow roots
Lower yield than expected
In the soil:
Surface crusts
Cloudy puddles
Ground stays boggy
Hard subsoil
Slow water infiltration
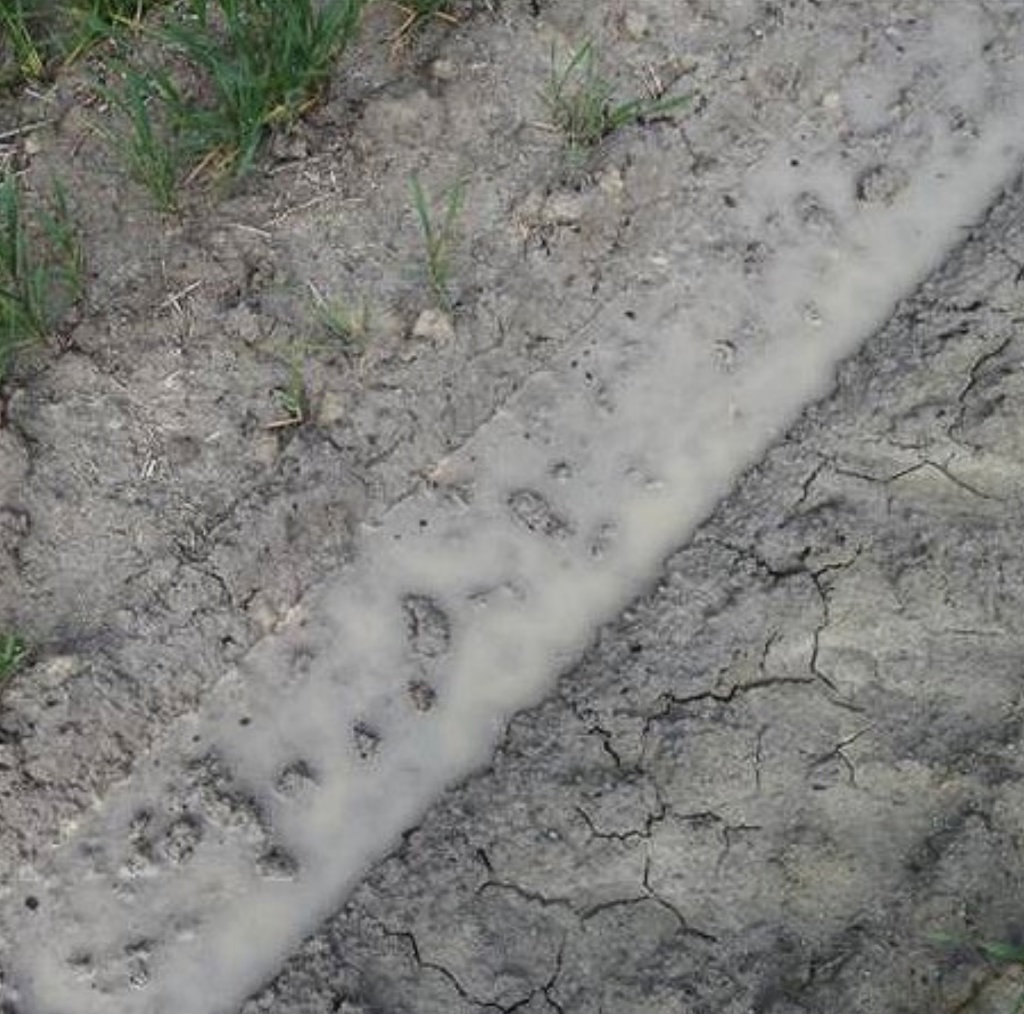
Figure 5. Common signs of a dispersive soil (Source: DPIRD)
The best way to diagnose dispersion is to do a dispersion test by either ASWAT or EAT test. This involve placing aggregates in a shallow dish of distilled or rainwater, and watching if they disperse and/or slake. For instructions on how to do these tests, see Appendix B page 56 of the GRDC Dispersive Soil Manual.
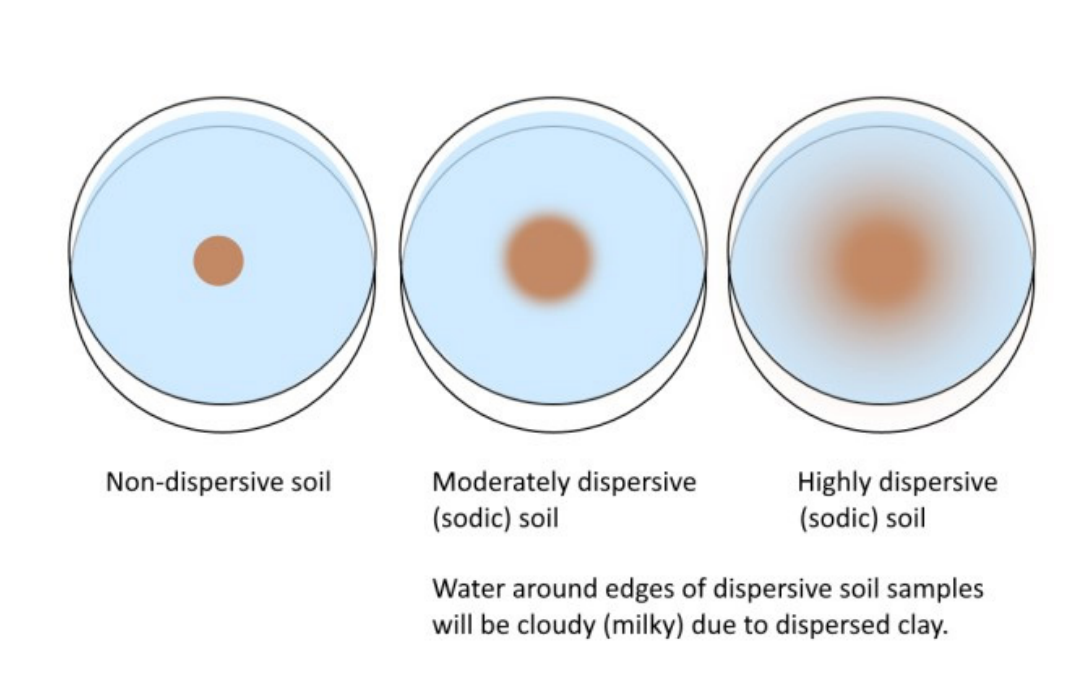
Figure 6. Soil dispersion test
Gypsum is the cheapest way and fastest way to treat dispersive soil. Gypsum works in two ways. In the short term it suppresses dispersion through salinity. This is known as the ‘electrolyte effect’. This effect only lasts a couple of seasons and is achieved with lower rates of gypsum, around 2-3 t/ha. For a long-term fix, ongoing gypsum applications eventually replace the sodium in the soil with calcium, allowing the soil to form more table aggregates.
As dispersive soils are often alkaline, elemental sulphur (ES) will lower pH, but it is an expensive product that warrants careful consideration before use. On calcareous soils, lots of ES is needed to lower soil pH which can become cost prohibitive. Applying too much ES can make the soil acidic. Use is more likely in horticultural crops with smaller land areas and higher value production.
As a source of calcium, lime can help treat dispersion where the topsoil has an acidic or neutral pH. This is less common than alkaline dispersive soil. Lime won’t help if the soil is alkaline.
For subsoil dispersion, crops with strong root systems and a sturdy tap root can create root channels for subsequent crops. This is called ‘root priming’. Lucerne (Medicago sativa), sulla (Hedysarum coronarium) and chicory (Chicorium intybus) are often suggested as root-priming crops.
Research is underway on using organic matter to treat dispersive soil. Organic matter improves aggregate stability and as it decomposes, bumps up soil salinity which suppresses dispersion. Trials at Rand, NSW found that placing wheat stubble and fertiliser at depth improved root growth, soil aggregation and yield.
At the moment, using organic matter to treat dispersion is not a cost-effective option if the material has to be brought in from off-site.
In Controlled traffic farming (CTF), vehicles use permanent wheel tracks reducing wheel traffic from 40-70% down to 10-15% on other parts of the paddock (Condon G & K, 2016). On top of limiting compaction and preserving soil structure after ameliorating the soil, CTF systems tend to have higher yields and lower fuel use.
Minimise cultivation
Cultivating dispersive soil is a perilous activity. Not only can ripping can bring clods of dispersive soil to the surface, but working dispersive soil can induce dispersion in mechanically dispersive soils (those that disperse after they’ve been worked).
If you want to rip or try to alleviate the subsoil density, do a test strip first and see what happens after it rains. If it makes the problem worse, it’s best not to rip any more.
In some instances, ripping is a way to place ameliorants such as gypsum and organic matter deeper into the soil, closer to the problem.
Machinery and stock foot traffic compact the soil, reducing pore spaces for air and water flow, and making it physically difficult for crop roots to grow.
Compacted soil:
Plough pans and traffic pans are the main types of ag-induced compaction. Plough pans form when repeatedly tiling the soil at the same depth. Traffic pans are caused by soil compression from vehicle traffic.
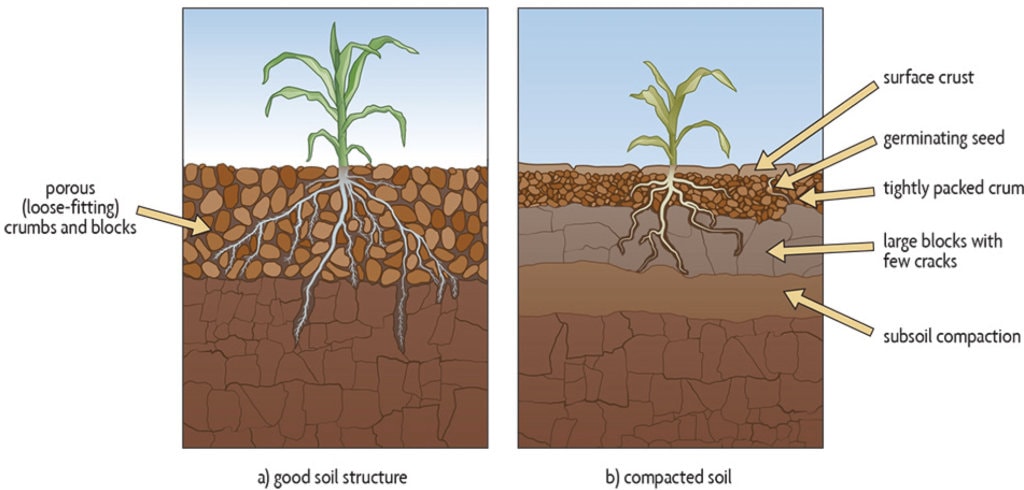
Figure 7. Plants growing in (a) soil with good tilth and (b) soil with compaction. (Source: Vic Kulihin, SARE, University of Maryland)
Digging a hole in soil often reveals where the compaction is. The soil becomes noticeably harder to dig once you hit the compacted layer. In a soil pit, you can sometimes see where the compacted layer starts, while the layer itself will look dense and blocky.
Measuring soil compaction is best done with a penetrometer. Dry soil can appear compacted, so penetrometers are best used whenthe soil is wet (not saturated). Readings above 1.6MPa indicate compacted soil.
Instead of a penetrometer, metal rod or sharp stick will help you find the depth the hardpan starts.
Staggered crop root growth can be a clue to compaction. Soil compaction could be the issue if:
However, root issues could also be from other problems such as acidity or a nutrient toxicity. Test soil salinity and acidity just below where root growth stops to rule out these potential chemical issues.
Soil hardsetting is different to soil compaction. Hardsetting can occur naturally, even if traffc is perfectly managed. Soils most prone to hardsetting are either:
Dispersive clayey soils (see )
Sandy soils with low OM (<2%) and very weak aggregates
Very sandy soils are typically devoid of soil aggregates (or peds). When wet, the aggregates swell and collapse (slake) so when the soil dries it becomes a hardened mass with little pore space. Hardsetting sandy soils become signifcantly harder (and problematic for root growth) as the soil dries. Penetration resistance increases exponentially as the soil dries, the soil hardening to a degree that crop roots cannot grow any deeper. The soil softens again when wet.
Managing hardsetting soils is a challenge. Even if ripping alleviates compaction, if the soil is prone to hardsetting it could become a problem for root growth the next time the soil wets then dries out.
The right management option depends on the cause of the compaction.
Busting up the compacted layer is often the fastest way to help roots grow deeper but does mean tilling the soil.
Ripping is the most common way to deal with compaction in sandier soils. The heavier (more clayey) a soil gets, the more variable the response and ripping can even result in yield penalties. Though any tillage equipment can work as long as it can work into or even better below the compacted layer.
Once ameliorated, traffic management is essential (e.g., CTF) as up to 80% of soil re-compaction happens in the first pass of the machinery.
Implementing controlled traffic farming (CTF) is the best way to avoid compaction. In CTF vehicles use permanent wheel tracks, reducing wheel traffic across other parts of the paddock. Once on CTF, tramlines are like roads and need managing. Over time they will compact, become rutted and difficult to traffic, and will need renovating to keep the tracks at a similar elevation to the rest of the paddock. The CTF technical manual has further advice for broadacre cropping.
Crops with strong root systems and a sturdy tap root can create root channels for subsequent crops. Lucerne (Medicago sativa), sulla (Hedysarum coronarium) and chicory (Chicorium intybus) are often suggested as root priming crops. No-till and CTF will help maintain the channels once they have formed.
Avoiding compaction in the first place is ideal. Don’t drive on paddocks when they are wet if you can avoid it. Use optimal tyre pressure. Over-inflated tyres cause more soil compaction, and under inflation reduces tyre life.
In non-wetting or hydrophobic soil, water struggles to infiltrate. Without water, crops will not germinate. Where water does infiltrate, it follows old root channels which are less hydrophobic, leading to patchy crop emergence. This makes in-season crop management activities such as spraying and fertiliser harder because plants are at different growth stages. It can also mean a greater risk of erosion on the bare patches.
Water repellence is caused when organic materials such as plant waxes coat individual soil particles, making the repel water. Fungal hyphae may also cause soil water repellence, but their influence is not entirely certain and seems to vary with species (Davies et al. 2022)
Repellence usually develops on sandy soils (<5% clay). It is unlikely to develop on clayey soils because clays have a much higher surface area.
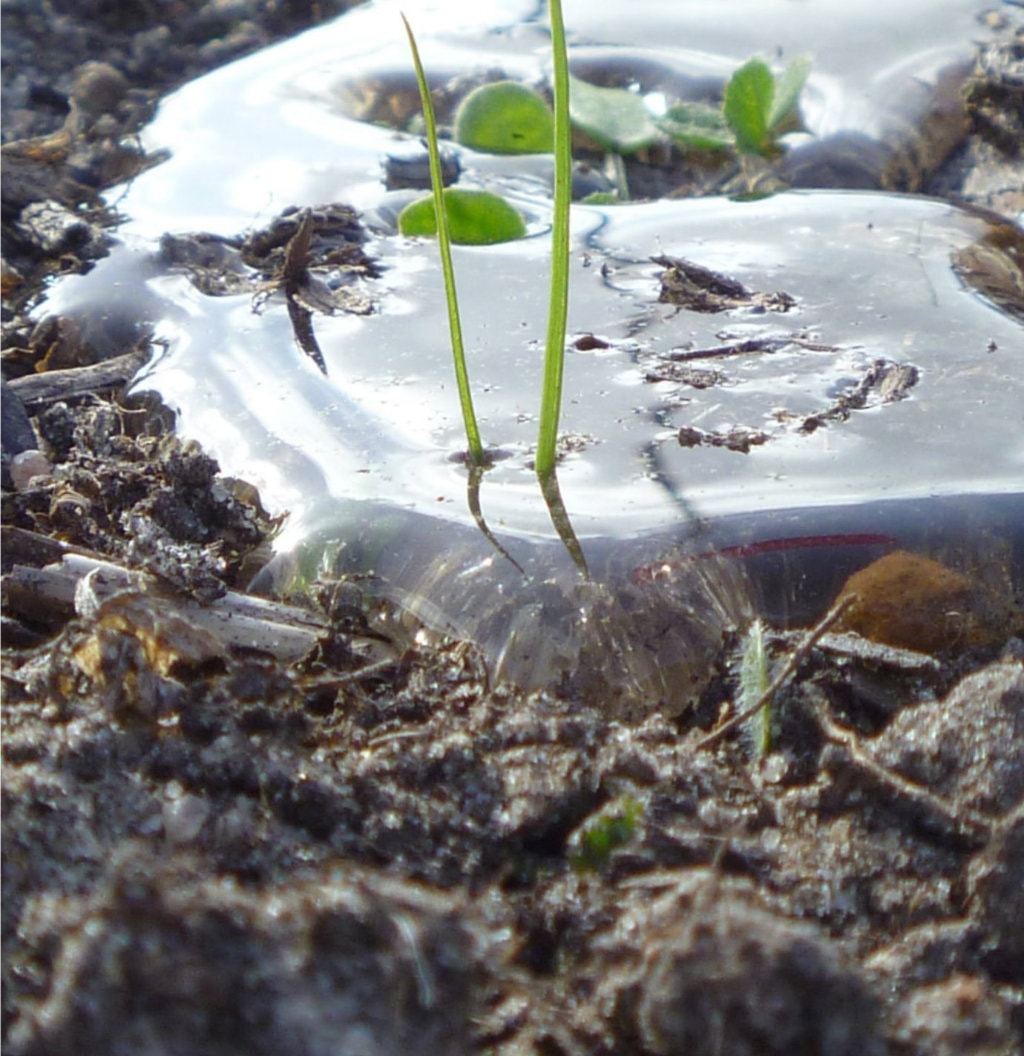
Figure 8: Typical convex-edged water drop suspended on repellent soil (Source: DAFWA)
The fastest way to test for repellence is to gently place a few drops of water on the soil surface. If the soil is repellent, the water will sit on top of the soil. The time it takes to filter in is a guide to how repellent the soil is. Water will appear to infiltrate but repellence is still lurking just below the surface.
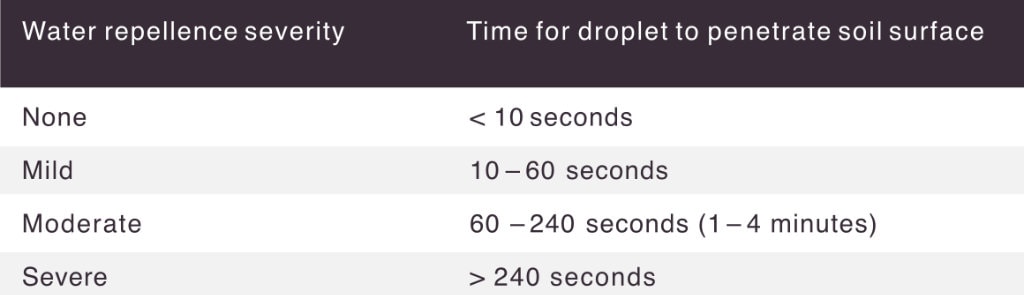
The MED test measures the concentration of an ethanol solution required to penetrate the soil in under 10 seconds. This test can only be done on dry soil as wetting the soil reduces repellence. It is also best done after scraping away the top 5 – 10mm of soil, because the sun can volatilise the waxes causing repellence at the very surface. In this video, Glenn McDonald from DPIRD shows how to do the MED test.
In the paddock, clues to water repellence are:
Water repellence tends to only form in the top few centimetres of soil. It is more likely to develop in minimum or no-till systems.
Wetting agents are a short-term option to help water infiltrate in the season they are applied. They are cheaper than long-term fixes (e.g., claying) and a useful ‘band-aid’ solution while working out an amelioration plan and budget for the farm.
Water infiltrates more easily into old crop rows. Sowing on or within a few cm of previous crops rows puts seeds in more wettable soil, giving it a better change of establishing. This method only works in no-till systems where old crop rows are still present. GPS guided tractors are necessary.
Furrow sowing creates small, alternating ridges and furrows. Slopes of water-repellent ridge surfaces allows water to run-off and collect at the base furrow where seed are sown, improving water infiltration to soil. Use of winged points is more effective for furrow sowing as knife points can be less effective because repellent soil flows around the point, into the sown furrow.
Using higher seeding rates, cross-seeding (sowing at an angle to
last year’s crop) and delayed seeding in the hope of rain are options
to increase crop establishment in non-wetting soil.
Claying means spreading and incorporating clay-rich soil into the sandy topsoil. Claying permanently fixes water repellence, as well as increasing soil water holding capacity. It is expensive, costing hundreds of dollars per hectare – but if done right, fixes the problem.
Like with claying, the goal with these practices is to increase the clay content of the soil and dilute the non-wetting soil.
For these methods to work, the subsoil mixed in or brought to the surface must have enough clay to increase the topsoil clay over 5%. If it doesn’t, water repellence can re-develop.
For more information on claying, inversion, or delving see Spread, Delve, Spade, Invert.
If soil acidity is also a problem, the pH boost from liming encourages actinobacteria which degrade the waxes causes repellence. This can reduce water repellence but is not an economical option if the soil is not acidic.
Waterlogging happens when drainage is poor, and the excess water fill in all the pore space in root zone. The lack of air inhibits gas exchange of roots and soil biological activity, inducing oxygen deficiency in roots and activity of anaerobic microbes.
Too much water in soil is a major constraint to crop growth and is sometimes caused by other soil constraints such as compaction and dispersion. Waterlogged soils can also stem from high water tables or active underground springs.
Waterlogging is more common on clay and shallow duplex soils. It can be tricky one to catch if the subsoil is waterlogged but you can’t see it on the surface.
Issues for soil:
Issues for crops:
Dig a hole and look for:
In pastures, crop such as tall fescue and Phalaris are more tolerant of waterlogged soil. Consider cultivars more tolerant of waterlogging.
Keep stock off waterlogged areas to avoid soil structural issues and further drainage problems.
If the waterlogged area is small enough it might be worth removing it from production and avoiding it completely. This is more likely in areas where a high water table or active spring are the cause, and mitigation options are limited.
Surface or subsurface drains reduce waterlogging but come with substantial costs. Weigh up the cost of drainage against the frequency, area, and severity of waterlogging.
Good drainage design needs careful planning, considering:
Surface drains are usually considered frst where they can re-direct surface water that is exacerbating waterlogging. Common options include trench drains, spoon drains, and hump and hollow drainage.
Subsurface drains are usually either pipes (AG pipe), mole drains, or a combination of both. Mole drains are subsoil drains installed in clay soils by drawing a mole plough through the soil and creating a channel. They will not work on soil with <35% clay or dispersive soil as they will collapse.
Raised beds are made with a bed-former that hills up beds about 2m wide. This raises the level of the planting surface and leaves open drains on either side of the beds to channel water out of the paddock.
Other soil constraints that affect productivity include:
Bryce A and Pluske W (2021)
Tackling amelioration on variable soil typesCondon G and K (2016)
Controlled Traffic farming the costs and benefitsGazey C and Davies S (2009)
Soil acidity: a guide for WA farmers and consultantsIncitec Pivot Fertilisers (2022)
Manganese Fact SheetMcKenzie D and Bryce A (2023)
Dispersive Soil ManualOrton TG, Mallawaarachchi T, Pringle MJ, Menzies NW, Dalal RC, Kopittke PM, Searle R, Hochman Z and Dang YP (2018)
Quantifying the economic impact of soil constraints on Australian agriculture: a case-study of wheat, Land Degradation & DevelopmentSoil Quality ebook series ( Apple books for iOS )
Uddin et al. (2022)
Amelioration of hostile subsoils via incorporation of organic and inorganic amendments and subsequent changes in soil properties, crop water use and improved yield, in a medium rainfall zone of south eastern Australia